Monday, December 14, 2020

Bathroom Updates

Picture from realtor's website - everything looks OK from this angle

The bathroom in the house on Joan avenue does not look too bad in the realtor's picture, but when we looked at things up close, we quickly saw rot in the floor from leaking galvanized iron toilet supply line, a wet wall behind the sink from the same issue with rusty galvanized pipes in the walls, damaged plaster and paint, a badly cracked marble vanity top, and flooring clearly past its best-by date. The room is small and the lamps on either side of the mirror also projected too far out from the wall. There was no electrical outlet in the room.

On the positive side, the cast iron tub is salvageable with some elbow grease to repair damage from a sliding shower door and the tub surround while a bit yellowed is also in decent shape. The window is newer and functional although missing some trim.

Yummy looking toilet flange and rotted flooring - note also the galvanized iron pipe on the far right


The vanity was quite attractive but the marble top had 4 large cracks in it and the cold water faucet was broken, so out it came 

The first thing was to remove the old vanity and old fashioned 4 gallon a flush toilet. This and tearing up the vinyl flooring exposed a broken cast iron toilet flange and considerable rot in the douglas fir flooring. The plaster was wet behind the sink from leaks in the supply lines. 

First I tackled the floor issues and toilet plumbing, removing the baseboards and rotted flooring and screwing and gluing down 3/4 inch plywood patches. I cut off the old cast iron flange and installed a costly but effective toilet flange that has a tapered, screw threaded base and rubber gasket. When you screw this down into the old lead pipe, the rubber expands and seals the gap. I had to cut back the plastic flange a bit because the lead pipe was not straight. I shut off the water and used an angle grinder to cut the old galvanized piping away in the basement.

Patch and a fancy new renovation flange that has an expanding  rubber gasket that seals against the old lead pipe.  

Next job was to install a new supply line. I initially brazed a copper to Pex adapter but my joints weren't any good as I could not get the solder to adhere to the brass fitting for some reason so I resorted to sharkbite fittings that are expensive but very simple and reliable requiring no soldering.


New toilet supply line


Supply line in place - you can see I have also started plaster repairs

The sink supply lines were next, and were a bit tricky to get in place as they come up through the walls and make a right angle bend. I had to open up quite a bit of wall to remove the old pipes and install the new ones. I used Pex plastic lines and a tool that installs what look like tiny hose clamps - very reliable crimped fittings.


Sink supply lines


Wall plaster repairs in progress - lots of fiberglass tape, drywall compound and pieces of drywall to patch

Painting was next - I picked a light blue grey from a paint collection at Home Hardware


Painted walls

New lights arrived in the mail from Home Depot. I kept the old medicine cabinet and repainted the inside. Note also the GFI electrical outlet added below the left light.


Before I could put back in the toilet, I had to install flooring. I chose Turkish porcelain tile because this was the least expensive and hardest wearing option. Less than a dollar a square foot, the total cost for installation including buying a tile cutter was under a hundred dollars. I already had some grout and a tile saw and angle grinder...

Flooring laid and freshly grouted


The toilet was a low flush Toto that, along with the vanity, I found for free on UsedCowichan.com. The owners were upgrading to a higher seated toilet and putting in granite counters. 

Happy to have a toilet back - it is a long walk down the hill to the public washrooms in the senior's center.

The next job was to install the freebie vanity and a sink I bought from an old home in Victoria. The sink was 18 inches deep and the vanity about 22. There was also a heat vent that I did not want to cover, so I had to do a lot of cutting and patching back together of the vanity in order to make things work. It took about half a day just for this, not even hooking up the plumbing.

New customized vanity and porcelain sink - note cut out at bottom right to allow heat vent to work

Drain pipes don't line up - I had to extend the drain tailpiece and cut back the plastic and other pipes

Today I finished off the under-sink plumbing, which required an extender to lengthen the sink drain tailpiece. I still need to paint and reinstall baseboards and make up new baseboards for the closet and where the old ones were damaged or missing. I also had to replace the hot water tank, when the old one leaked after I turned back on the water supply (it was a truly venerable tank). The house pressure reducing valve also required replacing.


Tuesday, December 8, 2020

The deck project

The house in Crofton had a covered deck facing north onto the street and covered by a large wisteria bush that had wound its way through the roof, gutter, rails and decking. Portions of the deck and railing were rotted and the roof was also damaged near the eaves and blocked much of the light to the living room.

Deck is obscured by wisteria and in rough shape. The previous owners place a loose board over the rotted decking to stop viewers from falling through.

My initial inclination was to remove the deck entirely and I planned a deck removal party with my friend Ian who helped me on a similarly destructive project a few years back. However I had a change of heart, realizing that there was no other suitable outdoor space accessible by a doorway that could be used for barbequing or just sitting out. I thought instead I would repair the decking, replace the railings and tear down the old roof. I checked the substructure and found much of it was still in reasonable shape although it would need additional supporting posts. 

When Ian arrived, he convinced me to keep the roof because he had a similar covered area at his house and found it very useful in our damp climate.


Deck railing mostly removed, roof cut back, and new decking boards in place. The original roof came right to the edge of the deck

We ended up tearing off the rotted railing and cutting the roofline back so that it was in line with the house roof to open things up a bit. We replaced some rotted deck boards and then retired to the local pub for a self congratulatory meal. 


The old lattice was in rough shape and missing entirely on the other side

The next step was to remove the old lattice from the front, and build a new railing using the same type of roofing panels I had put on the garage as infill. 


All old railings and lattice removed - new deck rails and posts in place


New railing infill completed - still need to fix those supporting posts


View from the living room. The back of the roofing panels used for infill is off-white

I used the same type of ranch board I had used on the garage to fill where the lattice had been and trimmed it with 1 by 6 pine.  I also replaced the rotted front supporting beam with a piece of cedar that was cut from a tree on our property a couple of years ago, and replaced some dubious support posts.

New supporting beam across the front, new corner post, and other posts mounted on concrete pads


Infill in place under the deck

I had to wait for good weather to paint the infill and to clean up, repair, and paint the existing stair railing as well as patch and paint the concrete. I also removed the old roofing and replaced it with new clear PVC roofing and added a new gutter that runs off into the city storm sewer.


Concrete patched and primed, stair railings cleaned and partly primed before it rained again


The way it looks now - Painted the same green and brown as the garage. The house stucco is also painted green. I will paint the window trim brown too eventually

To pretty up the entrance way, I found someone on Facebook marketplace selling a nice replacement half moon window. This saved replacing the door as the current window was broken and fogging up.


New door window - kind of Art Deco ish so in keeping with the house


Saturday, November 21, 2020

The Septic Tank

 Here is what the backyard of the house in Crofton looked like when we took possession.


Backyard from the MLS listing


Note the concrete ' pad' on the left and an old oil tank on its side beyond this. The edge of the garage is just in frame to the right. That concrete pad turned out to be the top portion of a septic tank - a fact I discovered by excavating the sewer pipe from the house and part of the perimeter of the tank. We had an initial scare when we discovered that the cast iron sewer pipe coming from the house still entered the tank. Fortunately, it carried right on out the other side and joined into plastic pipe connected to the city sewer.


The septic tank is about 6 feet by 4 feet when viewed from above. We excavated one edge to more than a foot so knew it was fairly deep,

I probably should have just lived with this tank in place and maybe used it as a base for a patio or deck. The cast iron pipe seemed to be in OK condition although various sources give its life expectancy at 50-100 years and we were at 70. Anyway... I picked up a borescope on Amazon that is a tiny camera on the end of a flexible line. I drilled a hole in the tank to put down the borescope to see if it had been decommissioned properly. I learned that it had been filled with dirt. Naively I bought a diamond concrete cutting blade for my Makita skilsaw and set to to cut and break the tank apart. The concrete turned out to be 6 inches thick and my blade that cuts maybe 2-3 inches was no match for this task. A frustrating morning of cutting and sledge hammering only opened up the much thinner top. 


Tank with broken lid and the resulting concrete bits


Ed - an elder in the church next door walked by the yard while I was hammering away and gave me the name and contact info for a couple of local guys who do excavation. After chatting with them we decided we needed to use the big excavator to get the tank out. I dug out the sewer lines and cut the cast iron near the house and the plastic just past where it joined the iron.

Before we get into the destruction, here is a nice picture of what our backyard used to look like...

What a nice green looking yard. The oil tank was emptied of its load of garbage (2 trailer loads to the dump) and then recycled. The garage is looking better with its new roof and paint.


The excavator was difficult to bring into the yard. It slid sideways off the trailer and nearly pancaked the garage. We plan to take down some fence wire on the other boundary to get it out.

Chris Vale arrived this morning at 9 and set to work turning the yard into something resembling a battle scene from the first world war. I will let the pictures speak for themselves. Chris is very very experienced having operated that machine for more than 20,000 hours over the last 20 years.


Chris Began by digging a hole into which he will put the tank once it is pulled out.

The pile will be used to level the yard so it slopes away from the house, filling a depression left by previous perimeter drain work


Next he turned to the tank and dug down 4 feet on one side. The tank did not budge.

After excavating 6 feet deep on the side toward the backhoe, Chris was able to pull the tank free. It took several goes and for a while all he accomplished was dragging the excavator across the lawn towards the tank.


The tank is free and upside down. It is six feet deep and has no concrete bottom - it was made of wood!

The tank must have been poured in two pieces because it split evenly when lifted.


One half is out and ready to bury. Chris dropped the other half a couple of times and it splashed into the water filled pit covering half the house with mud.


Overview from the back window - not much greenery left! The tank is buried in a shallow grave just behind the excavator. Note the mud splashed windows


New sewer line hooked up with flexible couplings to both the house cast iron and the plastic running to the city, which turned out to be a thinner walled pipe than modern ABS sewer pipe.

The destruction took only two hours and I spent the rest of the day installing the new sewer pipe and moving clay and rock around to fill in holes and cover the pipe. The pit where the septic tank is buried will serve as a rock pit to drain water runoff from the alley and neighboring uphill lot. I will bring in topsoil and level and seed the yard in the spring.

Saturday, November 14, 2020

Fixing Up an Old Garage

I have begun renovations on a 1950 house in Crofton, Vancouver Island. I plan to cover some of the projects on this blog.


House from the front - Note the enormous satellite dish on the roof and the wisteria covered roofed over deck. We will come back to those later, but first the garage, which can just be seen on the far right of this picture behind the house.


The garage just needed a lick of paint? Nope! The sills were rotting or missing altogether, siding missing, roofing boards rotted and the whole roof covered in tattered plastic wrap. If one was a perfectionist one would start from scratch...


This side wall was held up by the siding - the sill entirely gone and the studs either hanging in the air or resting on the concrete, rotted at the ends


The first step was to jack up this side of the garage to make it level with the other slightly less damaged side.  To do this, I used an old screw jack and a 4 by 4 post bearing on a 2 by 6 board screwed into the studs. The ratchet tie down strap pulls the 'floating' wall into place over the foundation.


Next step was to drill and use tapcon concrete anchors to hold down a new pressure treated 2 by 4 sill. Then each stud was cut away and replaced with a sister piece to reinforce it. Everything was screwed together with deck screws. Note that I used left over 2 by 4s from various projects so nothing is the same length... 


The tongue and groove siding was also missing or rotted in places. I could not find a match locally for the siding profile so I made tongue and groove planks from local 1 by 6 spf using a table saw.


The roof was next now that the structure under it was roughly level and more solid. Stripping off the plastic and removing the tarps I nailed up temporarily to keep out the rain, I found several rotted boards in the roof deck. 


The roof is patched. I replaced rotted boards with SPF 1 by 8 planks and cut off the tongues on the old planks to make them fit. Note the plywood patches on the wall and door. I have not tackled these areas yet


30 pound roofing felt stapled in place.


This is my first metal roof. One lesson learned is that I should either have sheathed the roof in plywood or used strapping under the metal because it telegraphs the uneven boards right through the metal if you kneel or walk on it! I learned after the first sheet to put it on without doing that. A bit tricky especially going back to put on the ridge cap...


Roof on and mostly level - a small sag in the middle from the underlying structure. Note the open gable ends that still need filling in.


Gable ends framed up and filled in with ranch board - a 3/8 inch textured plywood. I also added flashing to finish off the fascia. One side the garage is primed. Note the doors need trim replacing that must have been torn off when the hinges were replaced.


Garage painted. Side door still needs paint


Main doors are trimmed out to hide ragged bottom edges and frame pieces replaced too.  
 
I thought this would make the garage watertight but the first rainfall came and I found a lake inside. The water was flowing over the concrete foundation. A little digging and redirecting of run-off and the place is now dry and reasonably sound.


Monday, August 31, 2020

Replacing mooring chain

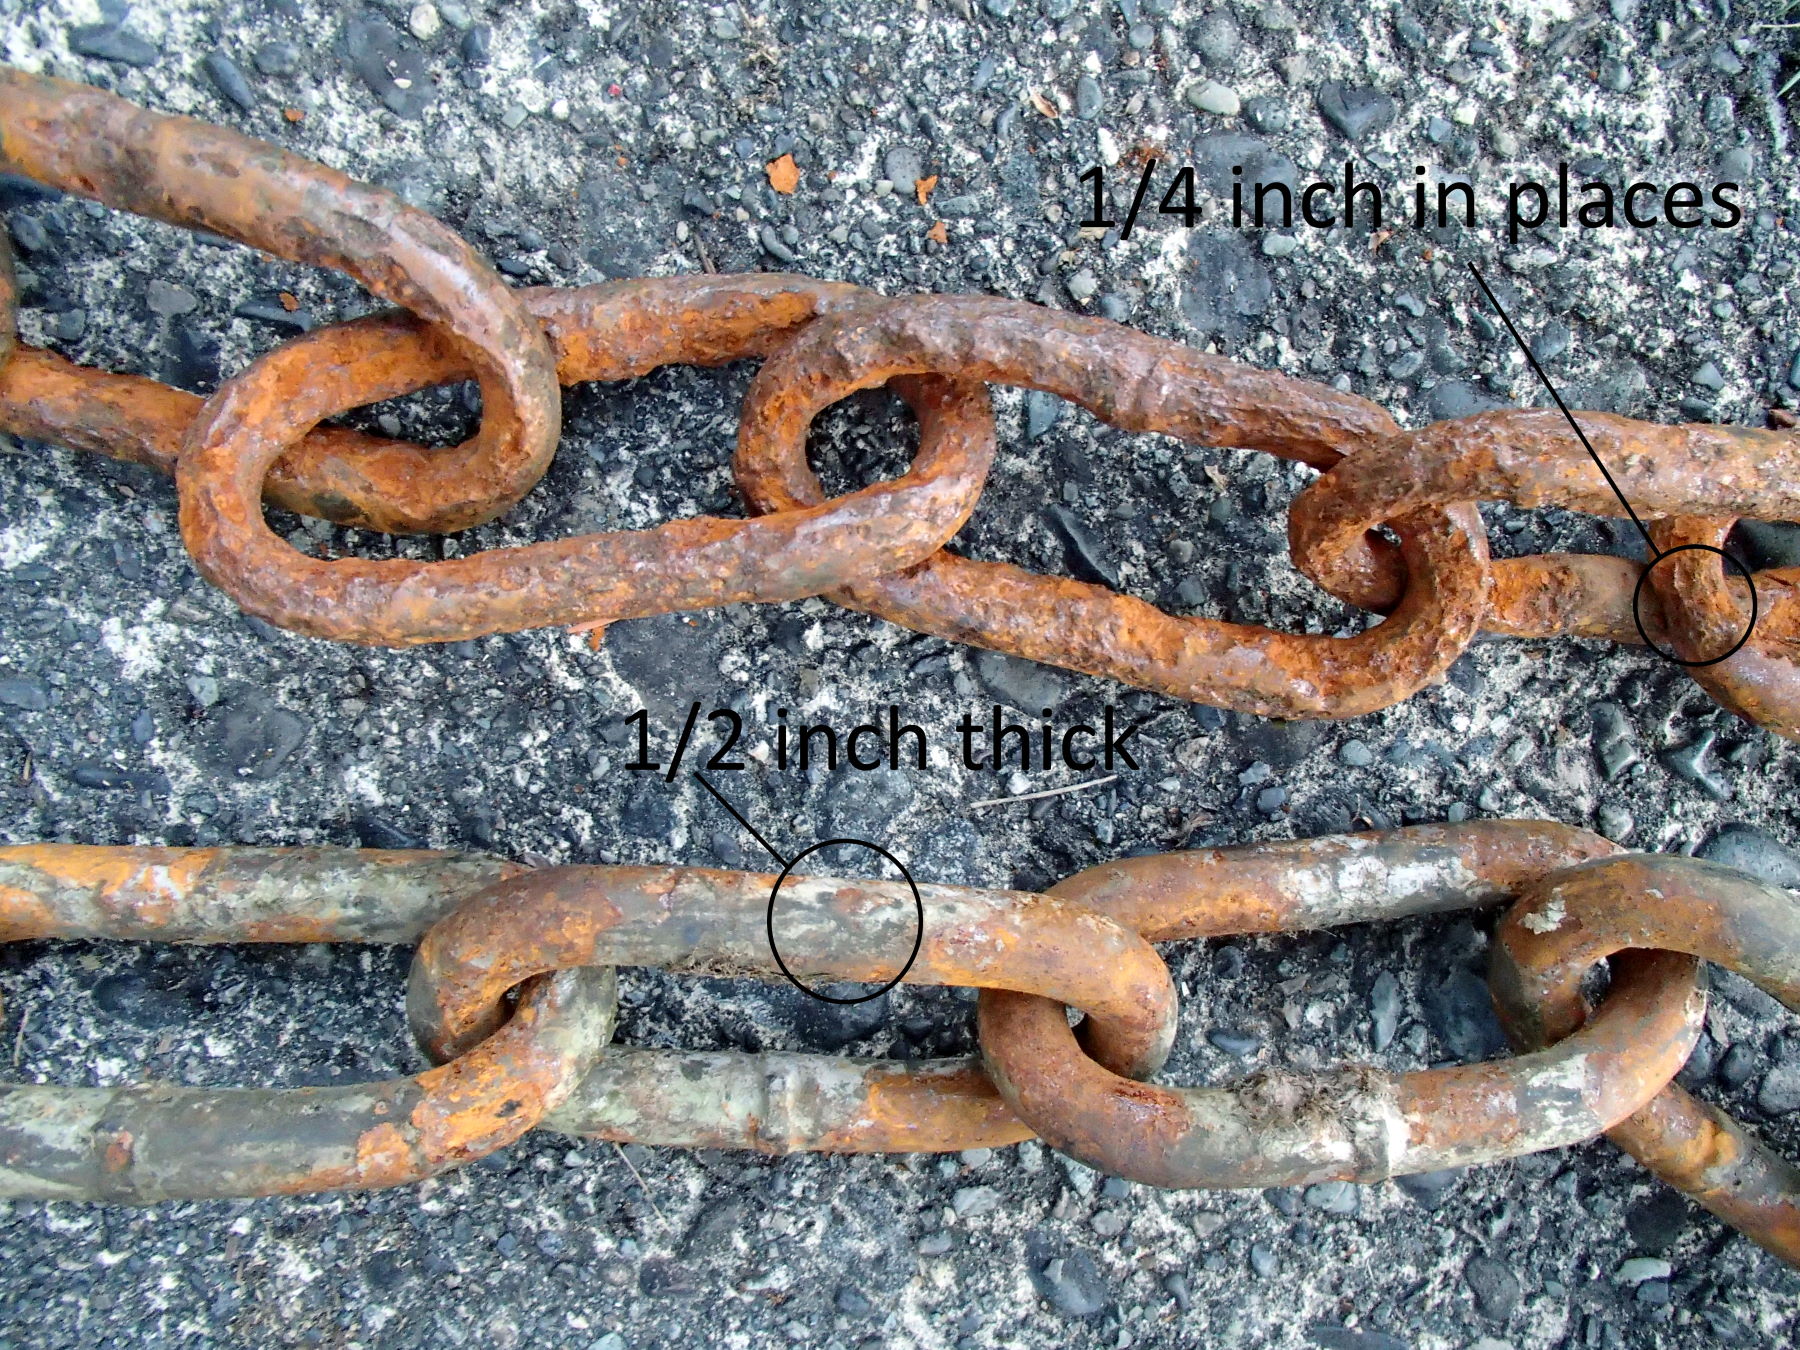
 We have kept our sailboats on a mooring in Maple Bay for the last 5 years or so. When I bought the mooring, it had 30 feet of 1/2 inch long link chain running from heavier chain that was attached to the concrete mooring block. I had a diver inspect the mooring that year and he gave it another year before I would need to replace the chain. The next year I did so, replacing it with new galvanized 1/2 inch long link chain. Each link in this chain is 4 inches long and 2 inches wide - the half inch referring to the thickness of the metal that makes up each link. The old chain was quite wasted away in the portion that rubbed along the bottom - the rest was in pretty good shape.


Thirty feet of old 1/2 inch long link chain - not the galvanizing still left on some links at the upper end


Four years later and it was time to take a look again. The half inch chain I put down had held, for 2 1/2 years, a 26 foot (5500 lb) sailboat and for the remainder of that time, a 3500 lb 24 foot sailboat. When I snorkelled on it earlier this year after bringing our new 32 foot 15,000 lb boat to Maple Bay, I realized that the chain was clearly in need of replacement before the winter storms arrive!

As in the earlier chain, it was only the portion that had dragged along the bottom that is in really poor shape, with about half the link thickness worn away in the worst places. See the following pictures for details.

Links nearer the surface are in excellent shape after four years

These are the worst links and have lost half the metal thickness and about 3/4 of their strength


Good and bad compared


This year, I replaced the bottom 25 feet of chain (below the swivel) with new 3/4 inch chain that has twice the strength of the 1/2 inch chain and should take longer to wear out. I also buoyed the bottom 10 feet to try to reduce its wear in rubbing the bottom. I used a cluster of milk jugs to do this but this was not overly successful as they compressed with depth and do not provide enough lift. Some sort of hard shelled float would be required to make this work.

One downside of the heavier chain is the increased cost (about 35% more expensive or $10 Canadian a foot including taxes when purchased in small lengths). Another downside is its weight of more than 5 pounds per foot, which makes it harder to place. Twenty five feet was about as much as I could carry from the car to the dinghy and I should probably have used a dolly to move it. I also dropped it too far from the mooring block and had to dive and drag it along the bottom to get it into position. It was heavy to move along the bottom and took me 5 extra dives to place it correctly. Fortunately the mooring is only in about 15 feet at low tide.

Sunday, August 30, 2020

Frugal couple's retirement questions

I came across a recent article in the Financial Post that tried to answer questions around the retirement of a couple whom the article billed as 'frugal'.The couple who live in our province (British Columbia) only have 2.5 million dollars in assets. When they both retire, their pensions (both private and government) will be around $70,000 a year. Even if they keep their fully paid off million dollar house, they should still be able to draw down on over a million in savings at say 3-4 % to give them about $100,000 a year in pre-tax income. I am sorry, but I really cannot see how one is living frugally if one spends approaching $100,000 per year!

Next week I expect to read in the Financial Post something like this:

A recently divorced single man, we will call him Jeff, is head of a well known international technology company. Jeff hopes to retire in the next 5 years. His current net worth is around 200 billion dollars but he hopes to re-marry and is concerned about what will happen if he does so and then loses half of his net worth in an ensuing divorce. He is worried that he may be forced to live through more than 30 years of retirement on the remaining 100 billion dollars.


Our advice for Jeff is to get a good pre-nup in place to limit his exposure in the event of a divorce. Next, he will want to take a close look at his spending, in particular on discretionary items such as vacation mansions, private jets, and mega yachts. He may want to taper off this spending as he approaches retirement, perhaps limiting purchases to one or at the most two mansions in the penultimate year. 

One silver lining in Jeff's potentially cloudy retirement future is that social security will likely be there to help make up any shortfall in his income when he turns 67 (Jeff is American). However he will still need to make it through 5 or 6 years on his investment income alone before this kicks in...

Saturday, August 29, 2020

Our new bidet

 One of the features of our older house (well older for the west coast of Canada anyway) that was built in 1933 is the split bathroom/toilet room. The toilet room contains only the toilet, the sink being in with the bath next door. Both rooms have doors, so if you want privacy and close the door, it is not possible to wash your hands after using the toilet before leaving the room touching the door knob - not an ideal situation.

My brother recently installed a fancy electric toilet seat by Toto, which provides a heated seat, an adjustable bidet wash for front and backsides with oscillating option, and even an air dryer to finish off the job. We were tempted to follow suit but it did seem a bit excessive (price in Canada is over $500 in most stores) and while searching for competitors we came across a much simpler option without the bells and whistles.

For around $50 (Canadian) we found what appears to be a well made 'ambient temperature' (aka cold) water unit that is fitted under your toilet seat and then plumbed into the toilet tank inlet via a provided 'T' fitting. The installation was simple and the quality of the fittings including the provided hose appears to be good. 

Biobidet fitted showing the pressure adjustment knob and valve and the nozzle unit. The actual nozzle drops down out of this unit when you open the valve.

The bidet works well in practise although because we are the first house on the Duncan water system, our 'ambient' water can be very cold even in the summer. If you have ever had an ice cream headache you can probably picture what I mean - ony transposed to a lower region of your body. One does get used to it and it is very nice to cut down on toilet paper and get really clean in a hands free way. However the heated seat and warm bidet wash of the Toto seat would certainly make trips to the bathroom more pleasurable!

Close up of the control unit - there are clicks for each position so you get feedback even if not looking at the dial.  

We found with our water pressure that the dial turned three clicks is about right and going to 4 gives a similar pressure but sprays a wider area. Going from 4 to 5 makes no difference. We bought our unit at Home Depot (online only order) but they can also be had on Amazon for a similar price. Do not test the unit without someone sitting on the seat. The pressurized jet soaked Rani and reached halfway down the hall when I did so.